'Tis the season to .... BBQ!

>> Monday 31 May 2010

The British Bank Holiday mandates a barbeque.

Everywhere in the country, we are taken over by the urge to group together, gather round a fire and eat meat! It's almost primeval! I am no exception to the rule, and this bank holiday weekend I have enjoyed my barbeque in the delights of The Cotswolds....(thank you Mr and Mrs T)


Street after idyllic street of beautiful houses and rolling fields. Gorgeous!! We were graced with one sunny day and the barbeque duly emerged from it's hiding place.


I think there is a bit too much focus on the meat element of the barbeque and I'm on a mission to widen it's use to salads and puddings too! I've written two of the recipes we used below, both meat-free and barbeque utilising! If the summer allows it, I'll add more over the coming months....

Courgette, Asparagus and Pine Nut Salad
Serves 4


2 large courgettes
1 bunch of asparagus
50g pine nuts (lightly toasted in a frying pan - optional)
1 lemon
olive oil
  • Diagonally slice the courgette and remove the woody ends of the asparagus
  • Drizzle over olive oil and season the courgette slices and asparagus spears
  • Place on BBQ for 5-8 minutes (turn half-way through)
  • Pile up on a serving dish, drizzle with oil, juice of half a lemon and scatter with pine nuts

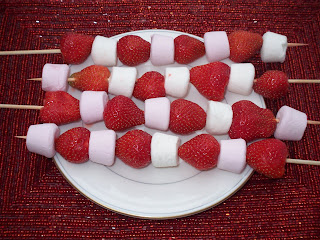
Strawberry and Marshmallow Kebabs
Serves 4


1 punnet of strawberries
1 bag marshmallows
4 wooden skewers
  • Add strawberries and marshmallows to skewers
  • BBQ for 5 minutes (turn once)
  • Serve immediately!

The finished result.....


...the picture doesn't show however, that we were cold in about two minutes and migrated rapidly inside. Some things will never change!

Quick update on my audition for ITV's Britain's Best Dish.......audition was on Saturday and I think went well. I've made some amends to my dish and will find out if I've made it through to the Regional Heats (televised...argggh!) next week. Fingers crossed!

Helen x

Read more...

Marshmallow Mayhem!

>> Saturday 29 May 2010

I'm so excited about posting this!

Those that know me well, will be aware that I have an unhealthy obsession with sweets. Ever since I was little I have been obsessed with trying every form of sweet available. One of the best cakes I've ever eaten was made by my mum for my 18th birthday. A giant carrot cake, covered in white icing and Haribo Starmix! It's got to the extent that friends even take pictures of sweets for me on their globe-trotting travels (thank you CN!)
I've progressed through the ranks of the humble penny sweet, to every single variant of Haribo and now I'm peaking at making my own. Over the past few months I have been buying molds and experimenting with recipes in order to reach my goal of creating my very own bag of 'Helebo'..or something that sounds slightly more appetising!

It starts here, with marshmallows...Who knew you could make these at home?! I have been so, so impressed with this recipe. The mayhem element refers to the amount of mess you make in the process, but this is such a cool thing to make that I can get over it.


Ingredients below will make a giant mound of 30 fluffy squares of fun!
  • 460g granulated sugar
  • 1 tbsp glucose syrup (you can get this from the cooking section of most supermarkets or try golden syrup if you can't find it)
  •  360 mls water
  • 4 tbsp powdered gelatine
  • 1 tbsp vanilla extract
  • 2 egg whites
  • 75g cornflour
  • 75g icing sugar
  • Food colouring (I used natural colouring in pink & blue)
  • Food flavouring (I used strawberry)
1. Line a deep tin (suggest a roasting tin) with tin foil and spray with flavourless cooking oil. Mix together the icing sugar and cornflour and shake a few spoons onto the foil to prevent the marshmallow sticking. Put the tray to one side (I used two tins to create the 2 colours)
2. Put 180mls of water, granulated sugar and glucose into a saucepan and stir over a medium heat until dissolved. Then up the heat to boil the mix until it reaches 260c (I just boiled it aggressively for a few mins until it looked crazy hot as I've not got a food thermometer - I'd leave it simmering for a while first though as it'll be another 15 minutes before you need this..)
3. To prepare your gelatin mixture, put the remaining 180mls of water in a saucepan with the vanilla extract and pour over the gelatin. Stir once and leave to absorb for about 5 mins. Then, heat the mixture on a low heat until it becomes liquid and add your colouring and flavouring (if you want multiple flavours/colours you'll need to start separating things into separate pans at this stage - extra mayhem for you - you'll need about 2 tsp each of flavouring and colouring for this amount, though it's really based on your personal taste)
4. Whisk your egg whites until soft peaks form
5. When your syrup is at 260c, remove from the heat and whisk in the gelatin mixture (this will foam up - be careful!). Then pour this slowly into your egg white mix whisking all the time (clearing a food mixer makes all this a lot easier). Once combined, you'll need to whisk on a medium-high speed for about 10 minutes until it holds it shape (soft peaks).
6. Pour into your tin/s and smooth the top out. Then you'll need to leave to set for 12 hours
7. Once set, put spoons of your cornflour/icing sugar mix on your kitchen surface and turn out your marshmallow (put it upside down on the surface and slowly peel off the foil). Using a sharp knife, dusted with powder, cut your marshmallow into your chosen shape, ensure all of the edges are coated in the powder to prevent stickiness

That's it (phew!!). It's lots of effort and mess but they taste amazing! They keep for up to 1 week in an air proof jar, but are best eaten within a few days of making. They'll get stickier the longer you leave them so, every day or so you might want to add more of the icing sugar coating.

 I think they'd make a really nice gift....


...or a cool dessert with fruit.....


...I made these by dipping strawberries in the mix and leaving them on a few spoons of the powder mix for 12 hours. Yummy, yummy!!

I can't take any credit for the recipe, it's from a professional cook called Elizabeth LaBau who has a great picture step-by-step guide here (worth looking at first I think). One little cheat worth thinking about, is not adding the colours until you're about to pour into your tins (i.e. make one big mix, split into a few bowls, add your add your colours/flavours separately and then put into your tins). I also want to experiment with lemon zest and fresh fruit chopped and mixed in. You could also cover the edges with chopped nuts, cocoa powder or maybe hundreds and thousands!

Hope you like and maybe try for yourself!
Helen x

Read more...

Easy Pea-sy!

>> Wednesday 26 May 2010

I've been away a bit this week. Horrid hotels and train food have left me wanting quick, comforting home-cooked food. I appreciate for many people this is code for 'take-away' but I have an aversion to take-aways and find cooking a relaxing exercise in itself, so this was not the solution I was looking for.....

Time to investigate the freezer! I always have petit pois in the freezer. They are great standby for lots of dishes:

  • pureed to serve with scallops
  • mixed with nuts, oil and cheese to make pesto
  • mashed with garlic and oil to make a bruschetta topping
  • combined with lemon and pecorino to make a silky, fresh tasting risotto
So frozen peas, a need for comfort and the contents of my cupboards resulted in this concoction....Pea Soup served with Pea & Pancetta Muffins.


All of this is very easy, from cupboard to table in 30 minutes! It's also comfort food without lots of calories (pancetta and a small amount of Cheddar are the 'naughtiest' ingredients).


Pea & Pancetta Muffins
Makes 8

225g Plain Flour
1tbsp Baking Powder
Pinch Salt
80g Pancetta with Herbs (I used Salisbury's cubed pancetta)
225ml milk
60g cheese (I use a mature Cheddar for best flavour)
100g petit pois (frozen)
  • Preheat oven to 180c/GM4
  • Line a muffin tin with 8 squares of greaseproof paper (optional - you could just oil the tin)
  • Pan fry pancetta on a medium heat until cooked
  • Mix together flour, baking powder, salt and cheese
  • Whisk eggs and milk and add to flour
  • Add frozen petit pois and pancetta
  • Stir gently to combine
  • Divide into 8 in a muffin tray and bake for 20-25 minutes

Pea Soup
Serves 4

1 onion
400g petit pois
1 clove of garlic (crushed)
500ml vegetable stock
2tsp olive oil
Cream to serve (optional)
  • Finely chop onion and gently sweat with garlic and oil for 5 minutes until softened
  • Add petit pois and stock
  • Simmer for 15 minutes
  • Blend with a stick blender/liquidiser
  • Serve (with cream if you wish....!)
...and there you have it! I now feel full and relaxed...though there is an empty bottle of wine in the kitchen, which may have contributed!

General food chit-chat

Really excited about the next post at the weekend 'Marshmallow Mayhem' - how to make homemade marshmallows!!!

Interview for Britain's Best Dish is on Saturday at 9a.m. Fingers crossed that feedahappylife food will be on a TV near you soon!

As ever, anything suggestions as to what you want to see here, let me know at helen@feedahappylife.co.uk

Much love,
Helen

Read more...

Herman's Here!

>> Sunday 23 May 2010

I was thinking about how I can get my friends involved in all this blogging and cooking that I'm doing. I thought about cooking a basic recipe together and each of us personalising with our own touches (like a Whoopie Pie party..). However, the reality of this is more likely to be drunken girls, gossiping while half-hearted cooking efforts are abandoned in the kitchen...time to think again....

Somewhere, in the recesses of my brain, I recalled a friendship cake recipe. I don't remember what it looked or tasted like but the wonders of google led me to an explanation!

Friendship cake was apparently an Amish tradition, where the cake was shared around the community. There are two elements; a yeasty starter and a more traditional cake mix which is stirred into the yeast mixture over several days.

Anthropologists say that people find meaning from sharing things they have invested their time in. Without getting too deep (this is a food blog after all!!), I think there is quite a lot of truth in that, and I'm happy to encourage it with this recipe! Cearly, I required a recipe, some time and some friends! Luckily, I managed to find all of these and am therefore able to introduce Herman to you!!

Herman is my friendship cake (Herman is the genuine name for this German cake!), made from a starter recipe of flour, milk, sugar and yeast. He had to be left for two days to grow and ferment before I could split him into three and share him with my lovely friends Sarah & Kaye...

I packaged little Herman up, with a wooden spoon (very important!) and his special instructions:


 ...which covered the basics of looking after Herman...
  • Do not put Herman in the fridge, please keep him warm.
  • Put him in a large bowl so that he can grow
  • Do not cover him with a lid, just a clean tea towel so he can breathe.
  • Only stir him with a wooden spoon. Metal stunts his growth!

....as well as the 7 day process to be followed before cooking him...
  • Day 1 – Herman has arrived! Place him in a large mixing bowl and cover him up
  • Day 2 - Leave Herman alone, he needs some ‘space’ (a case of the terrible two’s!)
  • Day 3 – Herman is hungry now! Feed him with self-raising flour (250g/8oz), sugar (125g/4oz) and give him a drink of milk (300mls/ 10 fl oz). Stir and leave him.
  • Day 4 – Say hello, stir and cover (he’s pretty independent now)
  • Day 5 – Say hello, stir and cover (he’s getting ready to leave the nest!)
  • Day 6 – Gosh, Herman has got big! Divide him into 3 and give 2 parts away
  • Day 7 – Herman is small again and sad. Liven him up by adding self-raising
I then organised the handover, and let little Herman loose!!


Now, this is not my recipe, I have never cooked it before and neither have my friends. So, the plan is for us all to follow the instructions and post the results here next week to see whether our Herman's all look the same! They will also have the opportunity to share some of their mix on Day 6 so they can keep Herman going (...an edible chain letter if you will!).

I am a little dubious as to how this yeasty, bubbling concoction will turn out, but it's been fun trying!

If you want to start of a family of Herman's, you can download all of the instructions here (it's a little temperamental, so e-mail at helen@feedahappylife.co.uk if you'd rather I sent directly).

Next week I'll be posting 'Easy Pea -sy" (collection of quick pea recipes) and Marshmallow Mayhem (how to make homemade marshmallows!!)

Hope you like
Helen xx

Read more...

Hasty Pastry...

>> Friday 21 May 2010

Last week, I continued my efforts to face my pastry fear by making short crust pastry for quiches (Tasty Pastry). I concluded, after much mess and stress, that homemade pastry is not for school nights!


I will definitely continue to perfect this skill (I’ll feel a bit of a cooking fraud otherwise – my inability always on the brink of being revealed), but I’m going to investigate a few cheats that are more fitting for mid-week eating (..hence, Hasty Pastry!)


I’ve played around with two different savoury tarts, both made from just four ingredients each and served in less than twenty minutes. Leaving plenty of time for wine and relaxing……Don’t let the simpleness put you off though, they are really, really yummy!


Ingredients

• 1 pack puff pastry
• 1 jar green pesto
• Tomato Tart only = Handful of cherry tomatoes (about 10 tomatoes per tart)
• Tomato Tart only = Cream cheese (about 1 tsp per tart)
• Asparagus Tart only = Handful of asparagus (about 4 spears per tart)
• Asparagus Tart only = grated cheese (enough to sprinkle over each tart)

First up….the Tomato Tart, which I’ve photographed at each stage to show you how easy it really is…

OK, heat the oven to 180c/GM 4, cut a circle of puff pastry (use a pastry cutter or a plate if you want to make one giant tart) and score a smaller circle into the pastry create a 2cm rim…..


Now, spread your pesto (about 1tsp per small tart – too much and it’ll go soggy) into the inner circle....


....and top with your cherry tomatoes which you’ve sliced in half...


Pop into the oven for 10 -15 minutes until the edges have risen and are lightly browned....


Pop on 1 tsp of your cream cheese and serve!


The asparagus tart is equally simple…prepare the asparagus by throwing away the woody ends (just snap them off, placing stalks in a covered bowl in the microwave with 1 tbsp of water and zap on high for 2 minutes. Cut your pastry into a rectangle and score a smaller rectangle to create a 2cm rim. Spread with pesto as before, place your asparagus on top and sprinkle with cheese. Put into the oven and 10-15 minutes later, you’re done.

 I feel a bit silly posting this as it’s so easy, but I think you need some quick standby dishes and I always have the basic ingredients in. I often serve this as a starter when I’ve not got a lot of time to cook. You can play around with the flavours too , I’ve put some options below but it’s pretty much anything goes!!

• Caramelised onions and goats cheese (sprinkled with thyme)
• Olive tapenade, sundried tomatoes and mozzarella
Sundried tomato puree, parma ham and dolcelatte• Red pesto, cream cheese and basil
• Quince jam, manchego cheese and parma ham
• Pea puree and pancetta
• Caponata and Parmesan

I’ve got some really good pastry dessert cheats too which I’ll share at some point (Hasty Pastry Puds…mmmm).

Hope you like – if you any cheats of your own, please share via Facebook!

Helen xx

Read more...

Exciting times!!

>> Tuesday 18 May 2010

A very quick message, to share with you my entry for the Best British Dish! It's for an ITV programme and the 1st round is on May 29th. I've entered two dishes, both desserts (!!), so fingers crossed.....


I played around with the above tonight - it's a Strawberries & Cream Macaroon Tower - this is one of the entries....

Getting back to recipes....I'll be posting Hasty Pastry (for the time poor and life rich) in the next few days and introducing Herman the German friendship cake this weekend!

Thank you for reading!
Helen

Ps. - have been playing around with layout, if you have any feedback, please let me know via Facebook group page!

Read more...

Vegetarian Yummyness...

>> Saturday 15 May 2010

Had a super-fun night last night cooking for and catching-up with friends, one of whom is vegetarian.

I'm always really conscious that people who are vegetarian or have food dislikes/intolerances aren't left out in the food department while everyone else scoffs away at the 'normal' food! I'm also pretty lazy and would rather cook one meal than lots of variations to accommodate everyone. So, my mission last night was cook a meal everyone would enjoy, vegetarians and non-vegetarians, that took minimal faffing on the night after a hard working week....

The answer was to prepare a menu where as much as possible was done in advance (and actually, the flavours tasted better for it) and was sufficiently robust to satisfy the carnivores too!

I made a Moroccan vegetable stew, which was rich and sweet, and served it with herby-apricot quinoa. For dessert we indulged in chocolate mousse with macaroons and we rounded everything off with an amazing cheese board (a birthday present from my lovely friend, Kaye).

The stew was really easy and the recipe allows for lots of personal variation....


Ingredients:

  • Selection of vegetables (I used 1 fennel bulb, 1 red onion, 2 carrots, 1 aubergine, 1 red pepper)
  • 400g tin of chickpeas
  • Selection of Moroccan spices (I used a mix from Schwartz but you could just use ground cumin, coriander seed and cinnamon)
  • Olive oil
  • 800g (2 tins) of chopped tomatoes (I used the ones with added garlic)
  • Handful of chopped apricots
  • Handful of raisins
  • Moroccan tagine paste (optional - I used Salisbury's paste from their Cooks Ingredients section, but you could just mix oil, tomato puree, seasoning and a spoon of your spice mix to get a similar product
  • Cinnamon stick (optional)
1. Chop all your vegetables into cube and mix with 1 tbsp of your spice mix and a good glug of oil
2. Roast these for 40 mins (suggest 180c/GM 3)
3. Whilst roasting is underway, mix your tomatoes, 1 tbsp paste, cinnamon stick, drained chickpeas, raisins and apricots in a pan and simmer on a low heat
4. When you vegetables are roasted, tip into your tomato mix and stir through

You can eat this straight away, but I think the flavours infuse more if you leave overnight.

I prepared a simple side of quinoa and apricots to serve this with. You can replace the quinoa with cous cous, bulgar wheat, orzo etc...


To make this, simply cook the appropriate amount of your chosen grain and mix with chopped apricots (use the juicy plump ones or alternatively simmer them in water to plump up first), pistachios, pine nuts, lemon zest, lemon juice, chopped flat leaf parsley, chopped mint, olive oil and seasoning. Clearly, you can easily adapt this with whatever you've got to hand! Flaked almonds are a nice addition too.

Pudding was a pretty special chocolate mousse (recipe from Good Food magazine), served with Macaroons (still attempting to master these...definite improvements still to be made!)...


Chocolate Mousse (make 12 hours before...)
Serves 4

  • 85g dark chocolate (70% cocoa content - the good stuff!)
  • 1 tbsp cocoa powder
  • 1/2 tsp coffee granules
  • 1/2 tsp vanilla extract
  • 2 egg whites
  • 1 tbsp caster sugar
  • 50g full-fat greek yoghurt
1. Break chocolate into small pieces and mix in a bowl with the cocoa, coffee, vanilla and 2 tbsp cold water
2. Place bowl over saucepan of simmering water (don't let it touch the water)
3. Stir until melted, then add 2 tbsp boiling water, stir and take off the heat.
4. Whisk egg whites to soft peaks and then add sugar, whisking until thick and glossy
5. Stir yoghurt into your melted chocolate and then gradually fold in your egg whites (don't overmix or you'll lose your air)
6. Spoon into 4 serving dishes (I used cappuccino cups) and chill for 12 hours before serving

You can get the recipe for the Macaroons from my previous post and I made up the chocolate filling as I went (essentially butter, cocoa powder and icing sugar all mixed together to create a thick paste).

Our final course, was a huge selection of cheese, which was delivered to me from The Cheese Society. They have great monthly selections which are such a cool present to receive and soooooooo yuummy!


I stamped the names of the cheeses out with a cute little stamp set I bought from Muji. On the assumption that you've not got one of these immediately to hand, you could use a little paint brush and squid ink/food colouring....


...it's very helpful when you're drunk and can't remember which is which!! The Cheese Society send you cheese tasting notes too, which is fun. My favourite was the Duddleswell, firm and creamy, mmmm....

So there you have it! The vegetarian feast for non-vegetarians too. It's actually quite an apt post, as it's National Vegetarian Week from the 24th to the 30th of May! Coincidence rather than planning!

Coming up next week, adventures in pasta, hasty pastry and the introduction of Herman the German cake of friendship...(all will be explained!).

Much love,
Helen x

Read more...

Tasty Pastry!

>> Wednesday 12 May 2010

I should drop a bombshell now...

I'm not really a great cook. I know I have a food blog and that I spend an awful lot of time thinking about food, cooking food and now writing about it, but I have as many failures as I do successes! My biggest issue is pastry.

Pastry is a bit of a sore point.


I don't understand how something so simple can be so complicated! It's either too dry, or too short, too warm to handle or too wet to roll! Argggh! However, given that I have books dedicated to pastry and you can have a career in just being a pastry chef, maybe it's not so surprising after all!

So, I'm facing my fear and my pastry issues. Pie by pie and tart by tart! Starting now with the humble quiche...

I'm starting with a pretty basic pastry recipe, taken from the tomb of all things good and foody, Nigella's "How to Eat" (I love, love, love this food bible!). Following Nigella, I combined the ingredients below in my blender - I'm quite sure a purist would combine everything on the kitchen surface with their fingertips, but it's a work night and speed and tidiness are more important than pastry rules (such rebellion is, quite clearly, the root of my pastry rubbishness!).

Shortcrust Pastry (according to Nigella)
  • 120g plain flour
  • 60g butter (cold)
  • 1 egg yolk
  • 1 teaspoon yoghurt (or lemon juice or creme fraiche)
When it's all combined, you need to chill it for about 30 minutes. Whilst this was happening I prepared a few fillings and the basic eggy-mixture for the quiche:
  • 150ml cream
  • 150ml milk
  • 3 eggs
Pastry cooled, I split it in half and added grated Parmesan to one half and chopped rosemary leaves to the other (this is because I forgot to do it pre-fridge!). This addition was a little experiment on my part to make the pastry a bit more exciting. After which, I rolled it out to fit my little tart tins. Big tip here... To save putting flour all over your surfaces, roll your pastry between two large pieces of cling film. It also makes it easier to lift and keeps it cool.

I added it to my greased tins, pierced with a fork and chilled again for 10 minutes. Then, they were covered with baking paper, filled with baking beans and popped into the oven (160c) from 10 minutes. Another tip.. if you've not got baking beans, you can use uncooked rice or pulses to weigh down the pastry. I've read that you can use old holiday money too as this is a good conductor of heat (obviously the coins and not the notes!).

I then took them out and added my different fillings. To the Parmesan pastry I added a medley of blanched spring vegetables (courgette, pea and broad bean)....


 To the rosemary pastry I added sweet potato and goats cheese......


 and caramelised onions and grated mature cheddar to the other.....


They were topped-up with the eggy mixture and popped into the oven for 15-20 minutes.
Another tip...if you're making a larger quiche it might need a little longer, so pop tin foil around the pastry edge after 20 minutes to stop it browning. Then, they were prised from their little tins and served!

All this took about 90 minutes, which admittedly is quite a lot of effort on a school night! So, whilst I will continue with my adventures in pastry, next week I'll be changing tack and featuring a blog entry called 'Hasty Pastry' where I'll sin and use the ready made version and see what the result is (time gained over taste lost maybe?!).

Next entry will be posted at the weekend and focus on my Friday night dinner with friends featuring a vegetarian food, fit for non-vegetarians too!

Thank you for reading.
Helen x

Read more...

Marvelous Macaroons!

>> Sunday 9 May 2010

I've spent this weekend with some of my lovely friends learning how to make delicious macaroons at the L'atelier des Chefs cookery school in London (a gift courtesy of one said lovely friend).

I first saw macaroons in Harrods, where I was wowed by jewel-like display in Laduree. I remember treating myself to a few of their delights, intrigued by the taste sensation that lay in store. Out they came of their beautiful turquoise box and, wowed by their sweet, creamy taste and crunchy texture, I devoured them all before I left the shop!


I have since managed a little more self-restraint (they're quite sweet and about 250 calories each, so restraint advised!) but my macaroon excitement has not diminished in any way.

I've never made them at home. Deterred by their delicateness, and with a knowledge of my innate clumsiness, I thought this was better left to the professionals. So, the two hour class at L'atelier des Chefs was a great opportunity to try them out. We were a group of about twelve, tasked with making four different types of macaroon and we followed strict steps to get to the finished product!

First we sifted almonds and icing sugar.....


...and then added to whipped egg whites, caster sugar and food colouring (they had some great powdered food colouring, not essential for the recipe but far more intense than liquid. I'm definitely buying some!)...


..next we spooned the mixture into piping bags and created our lovely macaroon shells on paper-lined baking trays (this was a real skill, the aim is to create a smooth dome rather than a peaked top - harder than it looks)...


...having let them rest for 10 minutes (you need a skin to form to prevent cracking in the oven) and given the tray a firm bash on the table (to release any big air bubbles), they went into the oven for 15-20 mins (you know they're done when they almost lift of the paper but there is still some stickiness left)..


....whilst they were cooling, we made our four different fillings from a table laden with ingredients.There were people, spoons and saucepans flying everywhere at this point! When I do this at home, I'm definitely limiting myself to two fillings at a time or they'll be more mess than macaroon...


We piped our yummy fillings onto our macaroon shells and sandwiched them together. Some people dusted with cocoa powder, some people topped theirs with grated orange zest and some people stuck to simplicity so they could eat them more quickly (yes, that would be me..). Regardless, we all left with boxes of our beautiful macaroons and a small amount of pride that we could create something quite so pretty!


Links to all of the recipes are below if you want to try your hand at these!
My two biggest bits of advice would be to limit the number of fillings you do in one go and leave time for everything to cool before you start sticking things together (my first caramel ones ended up a melting mess because the macaroons shells were still warm!).

I'm going to put learning into practice and make some of these next weekend for friends at my vegetarian feast night. Intending to create pink macaroons with chocolate ganache, served with a chocolate and raspberry mousse....Find out next week if it was disaster!!

Hope you enjoy,
Hx

Read more...

A politically relevent birthday cake!

>> Wednesday 5 May 2010

So...giant news...Tomorrow is a big day!

It's my birthday (and the slightly more well known event of the General Election...).

I have decided to mark the event by making a political birthday cake (inspired by Whisk Kid's chocolate and mango cake):


I should point out that I have not attempted any party allegiance in my positioning of the layers!!

Clearly just a bit of fun, but you could create a more sophisticated version with chocolate and vanilla layers and maybe a coffee cream icing. I used the same sponge recipe I've detailed in the 'best ever lemon cake' recipe (e-mail me at helen@feedahappylife.co.uk if you can't find it) and simply added the required amount of natural food colouring to get the right colour.

It did require quite a lot of icing to cover the mammoth size of the cake (just don't think about calories!) and I used the recipe/quantity below to cover the outside and sandwich the layers together.

500g Philadelphia Cream Cheese
600g Icing Sugar
180g Soft butter

1. Mix all ingredients together until smooth and desired consistency achieved


You can adjust the quantities quite easily though for taste and also runny-ness. It tends to be very sticky to begin with, but sets somewhat overnight. I'd really like to try American Frosting, which is a very different recipe but makes cakes look like they are surrounded by billowing clouds! One day soon...

Cake making and birthday news aside, I've got some exciting food activity coming up! Tomorrow night it's Michelin Star dining, Saturday is a really exciting Macaroon making course and from Monday I'll be joining a French cookery course for 8 weeks! Hopefully, I'll be inspired to write about more than cake....(maybe).

Happy voting!

Helen x

Read more...

Spring Feasting!

>> Monday 3 May 2010

The bank holiday has given me lots more time to cook, hoorah!

With friends coming over for dinner before an evening out on Monday, I had the perfect excuse to put the cooking wheels in motion. Everything feels super fresh at the moment and I wanted to capture that in the menu. So, we had a mixed crostini platter with pea and mint puree, avocado and lemon and chargrilled peppers for starter, followed by lemon and pea risotto with cod and gremolata for main and a trio of lemon puddings for dessert.

Starter and main were super easy (you can get all those together and cooked in less than 1 hour), pudding is a little but more effort (most of mine was done the day before), but well worth it! If you only make 1 thing that I ever write about, I would really recommend the lemon sponge. I've had the recipe since 2002 and it never, ever fails! Everything goes into the mixer in 1 go and then into the oven (so easy!) and it comes out beautifully moist.


Crostini are always a fail safe starter. For my platter I sliced 1 ciabatta, drizzled with olive oil and toasted in a hot oven (190c) for about 10 minutes. Whilst it was cooling, I pureed 2 handfuls of defrosted petit pois with about 6 mint leaves and a glug of olive oil. Then I mashed 1 avocado with the juice of 1 lemon and some salt for the second topping and finally I mixed chargrilled peppers with olive oil and some balsamic vinegar for the third (you can make these yourself really easily - e-mail me if you don't know how - or just buy a jar of them ready prepared). When the ciabatta had cooled, I heaped spoons of each topping onto the toasts and that's it!!


For the risotto, I made a basic white risotto (use a medium heat to soften 1 finely sliced onion and 2 garlic cloves in a good glug of olive oil, add 4 handfuls of risotto rice and stir, add 1 glass dry white white and stir until absorbed then add vegetable stock a ladle at a time, waiting until each has absorbed before adding the next) and then when the rice was al dente I added the juice of 1 lemon, 2 good handfuls of petit pois (I used frozen, you could use fresh) and 1 tbsp of mascapone. Stir through, ensuring peas are cooked and your risotto is ready. The mascapone makes this really creamy and unctuous, but the zesty lemon and sweetness of the peas stop it from being too cloying.

The fish was really easy. I placed 4 cod loins in tin foil parcels in the oven for about 15 mins (timing will depend on size of fish/whether you're cooking from frozen), and then served them topped with gremolata.


Gremolata is an Italian flavouring which you can use on lots of different things to add flavour. I generally stick to putting it on fish or vegetables, but Italians use it on lots of different meats as well.  It's very quick to make too, just mix 2 tsps of lemon zest with 1 finely chopped clove of garlic and 4 tbsps of chopped flat leaf parsley (I also add the juice of 1 lemon and some salt, as I think it's nicer..but it's not the traditional recipe). That's it! Quite a fancy name for lemon, herbs and garlic!!!

So, onto the best bit! Dessert! I made a trio of lemon puddings (sponge, posset and ice cream), which went down really well....


All the recipes below are really easy and make enough for 4-6 servings. Best of all, the ice cream doesn't require any fancy equipment!

Lemon Posset

300ml double cream
90g caster sugar
1 lemon (zest and juice)

1. Heat cream and sugar until dissolved and then boil (keep stirring!)
2. Take off the heat and stir through the lemon juice and zest (it should thicken a little at this point)
3. Pour into dish of choice (I used espresso cups) and chill until set (6-8 hours for best results)

Lemon Sponge (best ever!)

115g soft butter/margarine (I use Flora Light..)
170g self-raising flour
170g caster sugar
2 eggs
6 tbsp milk
1tsp baking powder

Lemon Syrup: juice of 1 lemon and 2 tbsps of caster sugar mixed until dissolved

1. Preheat oven to 180c/GM 4
2. Put all of the cake ingredients (excluding syrup) into a large mixing bowl and beat for 2-3 mins until smooth, glossy and easily falling from your spoon
3. Pour mixture into a lined cake tin (I've done this in loaf tins/round tins/cake tins and it works regardless!)
4. Bake for 30-40 mins until top is browned and a skewer comes out clean
5. Use the skewer to stab holes in the cake and pour the syrup over the top while the cake is still warm

Lemon and Rosemary Ice Cream (recipe from Times Online)

500ml double cream
100ml lemon juice
200g caster sugar
1tbsp lemon zest
2 sprigs rosemary (remove and keep the leaves)
pinch salt

1. Mix together lemon juice, zest, sugar and leaves from rosemary sprigs. Leave to macerate for at least 30, stirring occasionally.
2. Stir in the cream and salt.
3. Pour into a shallow plastic container and freeze
4. Wait 1 hour, remove and stir with a fork (to break up any ice crystals)
5. Put back into freezer and repeat after another hour
6. Freeze for 6+ hours (ideally overnight) and then you're ready to go!

Whilst no Ice Cream maker was required, this menu was made infinitely easier by a food mixer (mine is a Kitchen Aid, price justified by 10 year life expectancy and weekly usage = £0.73 per use!!!) and a microplane (a million times better than a normal grater for zest/chocolate shavings/nutmeg). Without them, it might just take you a little longer to prepare, but end result should be the same!

Hope you like! If you have any comments or suggestions for future recipes, please post them on the feedahappylife Facebook page.

Helen x

Read more...

Happiness is Cherry Jelly!

>> Sunday 2 May 2010

I have been inspired by the fantastic Cherry Blossom in bloom at the moment...


Apparently, it's the best bloom for years due to the cold weather. I can't think I've ever noticed it much before, but it's everywhere at the moment and it makes me smile just looking at it!

So, it got me thinking about cherry recipes and, with the optimism of bright sunny weather, something light and fun to eat. Well, what could be more fun than jelly?! I don't think I've ever indulged in jelly as an adult dessert. My jelly memories are firmly fixed in childhood with images of brightly-coloured, super-sweet puddings mixed into some gloopy mess with ice cream...hmmmmm!

Anyway, I've never made it 'properly' (i.e. not from a Rowntree's packet) and decided adult jelly progression was in order! A little recipe searching and some amends to suit my taste, time and supermarket availability, resulted in my Very Cherry Jelly below, enhanced greatly with a little Prosecco....


Serves 2
1 tin of cherries
125ml Prosecco (or sparkling wine)
75ml of cherry juice (drained from the tin)
40gms caster sugar
1 1/2 sheets of gelatine

1. Place gelatine sheets in cold water until soft (5-10 mins)
2. Heat cherry juice with sugar on a low heat and stir until dissolved
3. Squeeze out all the water from the gelatine and then stir it into the juice and sugar until dissolved (residual heat should be enough to do this)
4. Add the Prosecco and stir
5. Place a few tsps of cherries into the bottom of 2 pudding basins and half-fill with your cherry liquid
6. Chill for about 3 hours until it starts to set and then add another spoon of cherries and fill with the remaining cherry liquid
7. Chill for another 4-6 hours until firmly set

To serve these, place the pudding basin in a bowl of warm water (this will release the jelly from the edges) and then place a plate on top of the basin and flip over. The jelly will then be a lovely, glossy dome on your plate!

Now, I appreciate this is a little faffy (I suggest making the day before you need them), but it's really, really yummy! The jelly is delicately flavoured and the prosecco adds a naughty fizz....definitely adult jelly!

The point of half-filling then chilling and repeating is so the cherries are evenly distributed, however you could skip these steps resulting in all the cherries being at the top when you flip it over. I actually think this would be quite pretty (and easier!!).

I should also point out that vegetarians can use Agar powder as an alternative to gelatine and that the juice in the tin of cherries was actually apple juice, but it's coloured pink by the cherries and tastes more cherry than apple anyway! If you find a better alternative I'd use that to create a more intense cherry flavour.

I think I'll play around with this recipe quite a bit too. I quite fancy a Turkish delight style jelly using rose water and champagne and serving with crystallised rose petals. Also, think I might try pomegranate jelly using POM juice and pomegranate seeds.... I'll post all of these when I get round to making them!!

However, I should highlight my one disappointment on my exploration into the world of adult jelly...the Rhubarb and Champagne jelly below...


It was a Gordan Ramsay recipe, taken from The Times, which was a lot of effort (poach/cool/filter/mix/chill overnight etc..etc...) for not a lot of taste. I'll blame the Rhubarb on this occasion!

Helen x

Read more...

Blog template by simplyfabulousbloggertemplates.com

Back to TOP